
Gridrunner++ Strategy Guide
First things first...
First things first... as with real-life drugs (so I am told), so it is with videodrugs... set and setting are very important for an optimal experience. Get comfortable. Put on the kind of tunes that you like to play when getting immersed in hot shooty action (I personally recommend Underworld or Eat Static). Put them on your stereo or if you have nice audio on your PC, line up some nice mp3s. If it's night, turn out the lights and dance by the light of your monitor's glow. Fewer external distractions make for faster admission to the Zone, that trance-like, almost meditative place where twitch-gamers love to dwell...
Oh, and clean your mouse. That little rodent's gonna see some action ;).
Nuts and Bolts and the Naming of Parts
Some basics:
When you launch the game, it opens in a 480x640 window on your desktop. You can play the game in this native resolution, or resize the window to however you'd like it. I like to use the Maximise button and fill the screen with it myself. However, if your graphics card does not support 2D acceleration, you may find that the game runs slowly in anything but it's native rez. But chances are, if you're a gamer, your graphics card has a bit more grunt than that ;).
During gameplay, you can pause the action by pressing the Alt key. Should you need to do anything else on your PC while the game is paused, just Minimise the Gridrunner++ window, and restore it when you're ready to resume play.
Select options from the menu by clicking on them with your mouse. You'll most likely head straight for "Play Gridrunner Now!", which takes you straight through to level select and the game. You can also browse information about the game, and credits; choose "Slot Management", which allows you to maintain and select 4 player information settings. Go here to personalise your settings and to select the current player. Each player's progress information is saved along with the hi-score table at the end of a game.
The "Resume Best" option allows you to work on your best-ever game of Gridrunner++ over time. Your player information slot contains a record of the most lives you ever had when playing Gridrunner++. "Resume Best" allows you to continue play from the furthest level at which you had that best number of lives, with the score that you had upon reaching that level.
During gameplay, should you wish to abort a game in progress, just press the End key on your keyboard. This will finish the game in progress and present the hi-score table.
When you're finished playing, just select the Quit option from the main menu to leave the game and close the window.
Basic controls:
During gameplay, your ship will follow the position of your mouse pointer in the window. There is no need to hold down the mouse button to fire - the ship fires continuously automagically. Simply move the mouse gently to move your ship.
In addition to your normal weapon, you have a special weapon - the Sheepiezapper - that you can use once per level. The Sheepiezapper is recharged at the start of each new level, and should you lose a life during a level, your new ship will come with a shiny new freshly-charged Sheepiezapper factory-fitted :).
Press the right mouse button during a level to unleash the SheepieZapper :).
And that's it, really - just the mouse and one button :). Simple, elegant, and all you need :).
Identifying the Basic Elements
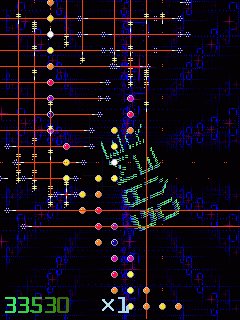
Here is your ship. In this picture it's firing it's basic weapon, rapid-fire lasers. This firing is automatic and continuous.
Most of the time you'll move your ship with gentle motions of the mouse. At times, however, you may feel the need to move quickly, and experienced players will learn to reposition their ship out of danger with a quick flick of the mouse.
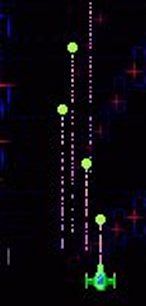
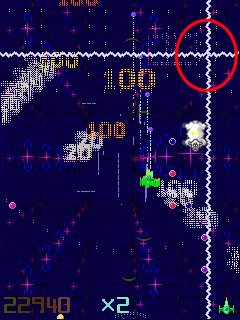
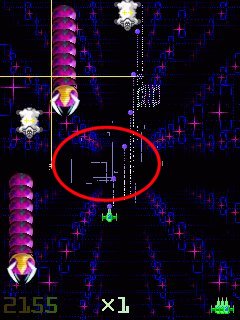
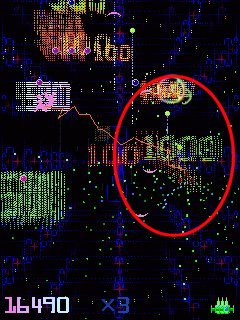
The circle highlights your basic enemy style. The main enemies in the game attack in chains or "snakes". These can move in a variety of different ways - "boustrophedon", in which they traverse the screen, turning at the screen's edges, getting closer with each traverse; or on diagonals, as here, where they bounce off the screen edges. On other levels they may circle around the player, or move in sinusoidal patterns. You will discover many styles of snake behaviour as you play the game.
Sometimes, shooting a snake's head will cause something to happen to the entire snake. Sometimes the whole snake will die at once, yielding a load of points. Sometimes the segments making up the snake's tail will fragment and begin flying around the screen - a much more dangerous proposition for the player. Be aware and ready to respond if this happens!
Snake heads may also drop bombs on the player. As the game progresses you will encounter snake heads that bomb up and left and right as well as down the screen. Bombs can be shot with the player's laser.
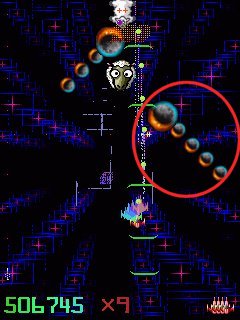
Here we see a second enemy type, the Drop Ship. These can emerge from any of the screen edges, and leave behind themselves a trail of deadly Pods. Shoot them early to avoid being hemmed in by lines of Pods that divide the play area. Later Drop Ships may also carry lasers that span the width of the screen. Shooting laser Drop Ships is therefore an imperative!
Shooting snake enemies also creates Pods. Snakes tend to turn when they encounter a Pod, too.
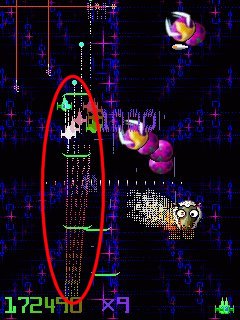
Don't run into Pods! They kill you deadly!

If Pods are not dealt with by the player, they throb brighter and brighter and eventually burst, emitting lasers in all four cardinal directions before expiring. Here, a chain of Pods left by a Drop Ship kicks off in a spectacular and deadly pod laser cascade.
You can shoot Pods, and I highly recommend that you do so. Keep your play area clear of Pods, and you won't get caught out by unexpected pod lasers going off restricting your freedom of moo-vement.
This is what happens if you let yourself be overrun with Pods! Shoot them promptly :).
Early in the game Pods can be cleared with a single shot, but later in gameplay you may need to take more shots to remove them.
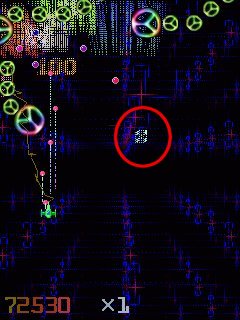
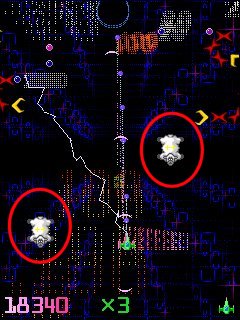
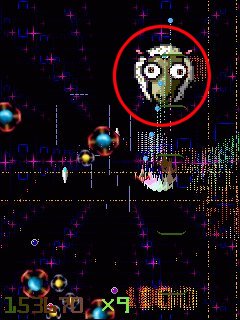
The third enemy type is a bit more subtle. There is one on every screen, and it's called the X-Y Zapper. It cannot be shot, and most of the time it is benign. It takes the form of a particle-y cube thingie that bounces around in the space "beyond" the plane in which the action takes place. When it's small and distant, as in the screenshot above, it's completely harmless. But it's important to keep an eye on it, because it's behaviour can be deadly.
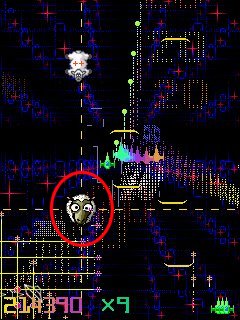
Here's the first sign of trouble - as the X-Y Zapper approaches the "front" of the screen, it begins to pulse white and becomes more "solid". This is the pre-firing phase, and it is announced by a distinctive audio "chirp". This is your cue to keep an eye on the Zapper and be ready for what happens next.
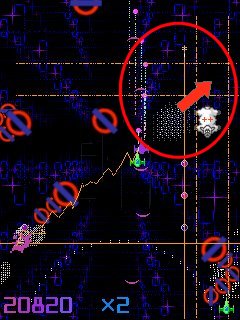
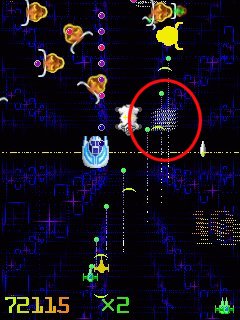
You will see converging sparkly golden lines appear on the screen. These indicate where the Zapper is going to "bounce" off the plane of the play area, and, in doing so, fire it's deadly weapon. learn to be aware when you see the golden lines appear, and if you're in the area where they are going to converge, take steps to move away from that area. Soon it will become second nature to spot the warning signs of imminent X-Y Zapper activation, and move yourself to safety accordingly.
A split second after the previous screenshot, and the X-Y Zapper has triggered in the area indicated by the golden lines. Fat laser bolts cross the screen in that area, and if you are caught in them, you will die. Although in this case the poor player has managed to die by other means, and is just starting to fall apart :).
Now for a look at some of the good guys!
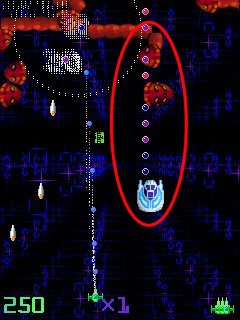
These are Sheepies. It's your mission to rescue and defend the sheepies! Every few enemies you shoot, you will hear a quiet "Baaaa!" and a sheepie will float down from the top of the screen. Try to collect these sheepies whenever you can. They increase the power of the weaponry on your ship, and also give you bonus points. Collect the sheepies by touching them with your ship.
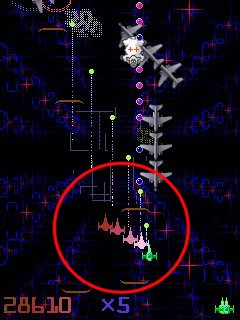
Each sheepie collected increases the Bonus Multiplier by one, and you also get a trail of pretty "ghost ships" that follow your movement. These ghost ships fire forward- and rear-firing lasers - very helpful indeed on many levels :).
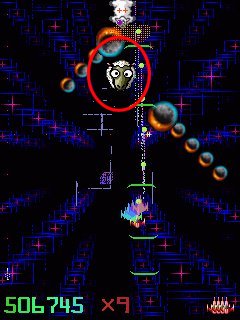
If you collect enough sheepies that your Bonus Multiplier maxes out at x9, then the next sheepie collected will give you the Pill. The Pill is a cross-eyed sheep head that swoops around the screen, killing enemies by running into them :).
You can shoot at the Pill, too, and indeed it's a good thing to do so. Shooting the Pill doesn't do it any harm - in fact it does a lot of good, making the Pill get momentarily bigger, and filling it with energy (and scoring you points!).
Shoot the Pill enough times and this will happen - the Pill emits horizontal and vertical lasers, which are extremely deadly to the enemy! The Pill will swoop about destroying many enemies in a very quick time. The lasers do have a limited duration, though, and shut down after a while. You can then start shooting the Pill again to build up the energy for the next burst.

Finally, there is your SheepieZapper. This weapon, triggered by pressing the right mouse button, randomly attacks enemies on the screen, for a period of time determined by the current value of your Bonus Multiplier - the higher, the longer. You can use the SheepieZapper once per level or once per life, whichever is the shorter. It's not as instant as a Smart Bomb, so you need to be ready to stay alive in your immediate area whilst it does its job. And beware, because even though the SheepieZapper is great for clearing enemies, in doing so it leaves behind many Pods scattered over the play area. I usually make it a priority to do a bit of a Pod sweep while my SheepieZapper is doing its thing, so as not to be in for any unpleasant surprises!
Well, that's the basics down. Now for some more advanced tips and strategies.
Playing Beautifully
First and foremost - small moves, my friend, small, gentle moves. Be graceful. Good play really *is* beautiful play; motions should be fluid and controlled. Jerk the mouse too quickly and you'll end up zapping yourself on a Pod or running into a laser. You'll learn in time when a quick flick of the mouse will get you out of danger. But always, control and grace.
Sheepies and the End of the Level
When the level ends, there are often still sheepies floating down the screen.
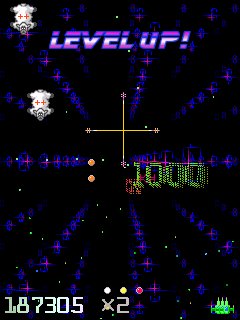
You want those sheepies at the end of the level! Even though your ship will be rezzing out, a glowing red outline remains that you can control for as long as the "Level Up!" text remains on screen. Use this time to collect as many precious sheepies as you can!
There are two main reasons for this. Firstly, of course, you get points and a BM increase for each one you collect. But most importantly, sheepies collected as you leave the level will benefit you at the start of the next level.
This special, blue-and-red glowing sheepie is called a Continuity Sheepie, and you get one on any level where you managed to collect some sheepies at the end of the previous level. If you grab the Continuity Sheepie, then your weapon powerup and Bonus Multiplier status from the end of the preceding level are instantly restored! Which can be a handy start to a difficult level :).
The Continuity Sheepie is always the first sheepie or a new level. Miss it and it'll be gone, so always make a point of collecting that first sheepie :).
Sheepiezapper Strategy
The Sheepiezapper is not only a useful weapon to have in a tight spot, it's also a way for you to maximise your score on any level. Points scored for kills made with the Sheepiezapper are more than for regular kills, so even if you are not in danger, it pays to use up the Zapper before the level ends, so as to gain the most points.
There is another good reason for using the Sheepiezapper to end a level. You need sheepies at the end of the level to ensure that you start the next one with a nice Continuity Sheepie. However, if you have the Pill, sheepies are less likely to appear, because enemies killed by the Pill don't count towards a sheepie. However, enemies killed by the SheepieZapper *do*. So as you near the end of the level, it's good to Sheepiezap, because that will bring out lots of sheepies, which will hopefully be there on screen as the level ends, waiting for you to collect them.
But how do you tell when you're near the end of a level?
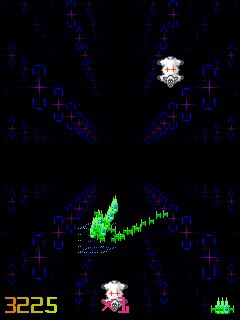
See those little white trails that move about some distance "into" the screen from the plane of the play area? They represent enemies as-yet unspawned. While there are plenty of trails there, there's still a fair way to go into the level, and it's probably best to hang onto your Zapper in case you need it in an emergency. But every now and again, take a glance at the trails, and when there are but a few left, it means you're nearly through the level. So trigger that Zapper and go out in a blaze of glory :).
Watch for Incoming
There are little graphical clues which tell you where enemies are about to appear from. At first you probably won't notice them, but after a while you'll learn to see the clues in the periphery of your vision, and be warned to move away from a screen edge in response.
See that coloured particle trail coming from your ship and extendiing down to the bottom of the screen? That's an indication that enemies will soon appear from around that point on the bottom screen edge. Either move away or, as here, line up with it so that your rearward firing catches them as they emerge :).
Do the Sheepie Save
The Sheepie Save is one of the most important and useful strategies in advanced Gridrunner++ play. The basic mechanic of it is as follows:
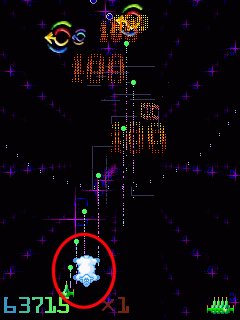
Oops - you're dead. But you may have noticed that when you die, you can still steer the exploding wreckage of your ship somewhat. There's a good reason for that :). You'll notice in the shot above that the wreckage is heading for a sheepie. If you can steer it so that the very centre of the wreckage actually falls on the sheepie...

...your ship will magically start to un-explode and reform where your mouse pointer is...
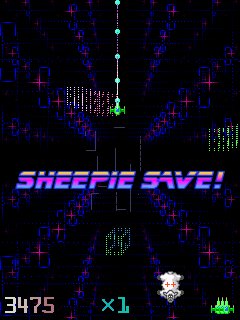
...and then you're restored to life and ready to fight another day!
Therefore it is good strategy on a difficult level to play fairly high on the screen, and occasionally deliberately let a sheepie get past you. That means that if you should unfortunately die, then there is a sheepie below you which you can, literally, fall back on, and be restored to life!
You can also, if you're bold, use the Sheepie Save pro-actively. When you die, all the enemies on screen are killed or take damage - it's like a Smart Bomb effect. If you have a sheepie in the right position and you are confident that you can fall onto it, then it can make sense to kill yourself deliberately, effectively Smart Bombing all the enemies, and then be SheepieSaved back to life on a nice clear screen :).
You can also use the same technique to get out of desperately tight situations - if you see a sheepie below you in a safer space, get killed and be sure to steer the wreckage onto that sheepie, and you'll be restored to life in a better place :).
You don't get points or a BM increase for sheepies used in Sheepie Saves (unless it's the Contiunuity Sheepie), so of course it's a trade off between collecting every sheepie for maximum points, or letting a few get behind you as insurance for bad times or for use strategically as outlined above.
Use your de-rez time
You might have noticed that whenever you collect a sheepie, your ship actually fragments into its component particles briefly before re-forming itself. During this brief period of time, you are invulnerable.
You can use that time to get out of a desperate situation - if you're caught in a tight spot unable to move, a quick and decisive flick of the wrist when grabbing a sheepie can move you over or through obstacles that would otherwise kill you, and you'll re-form in a nicer place :). You need to be bold and confident to get this right, but it has saved my bovine @ss on many occasions!
Trust your arse
Although the Gridrunner ship only comes standard with front-firing lasers, the very first sheepie collected adds rear-firing ones, and with each sheepie both front- and rear-mounted firepower becomes more and more powerful.
It is very important to learn to fight just as comfortably with rear lasers as with front ones. Trust your arse. Being fluent in fighting attacks from above and below means that you don't get forced down to the bottom of the screen; you can hold your ground wherever you happen to be on the screen. On some levels it is actually much preferable to fight from the top of the screen - especially if you are employing the SheepieSave strategies outlined above. On any level it is important not to let them crowd you into a place that you don't want to be.
You will become so comfortable shooting both up and down that for the first few instants of a level you will feel quite nekkid without your rear lasers. The first sheepie is the most important one!
Learn how to control the snakes' movements
Certain things that you do will alter the motion patterns of some kinds of snakes. For example, snakes that are moving diagonally will often change to regular, side-to-side motions if shot in the head. Regular snake movement can be easier to deal with than diagonal motions, so shoot diagonal snakes high up on the screen to get them to revert to the boustrophedon motion.
There is an exception to that - a time when you want to make a regular snake start moving diagonally. If snakes are closing in on you from the sides, in regular boustrophedon motions, then there is a technique which I call the "Push Upstairs", after the Underworld song :). Simply flick your ship up momentarily so that it is above the closing snakes. They will "see" your ship go up there and start climing diagonally upwards towards it. You, of course, then drop back down beneath the snakes that are now climbing away from you - and straight onto your waiting laser :).
You can also take advantage of the fact that snakes turn at the visible screen edges, yet the playfield scrolls when you move. You can take advantage of the scroll to nip around a snake that has begun turning already.
I'm sure you'll discover your own little methods and strategies as you play through the game - hopefully these will give you a head start. The most important thing, as in any shooty game, is simply to stay alive :).
- Yak 10/8/2002
More >>>
- First Things First
- Nuts and Bolts
- Identifying Elements
- Playing Beautifully
- End of Level
- Sheepiezapper Strategy
- Watch for Incoming
- Do the Sheepie Save
- Use De-rez Time
- Trust your Arse
- Snake's Movement