Space Giraffe
The Basics:
Gain complete conceputal understanding
of Space Giraffe in TWO EASY LEVELS
Part One:
I’ll assume that you’re familiar with the absolute fundamentals – moving the giraffe around and aiming the shots using the two analogue sticks (or the keyboard, depending on your control preferences). That’s hardly rocket science, and if you’ve ever played a shoot’em’up before it’ll be familiar ground.
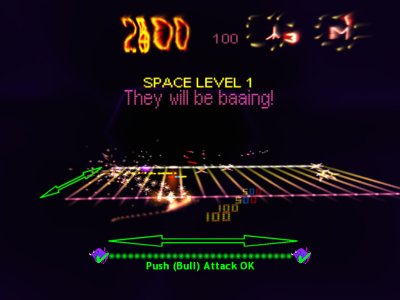
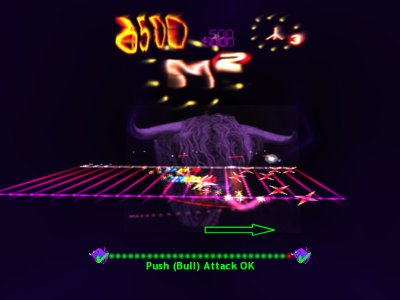
OK, let’s press on. Here you can see the giraffe arriving at the edge of the first playing surface:
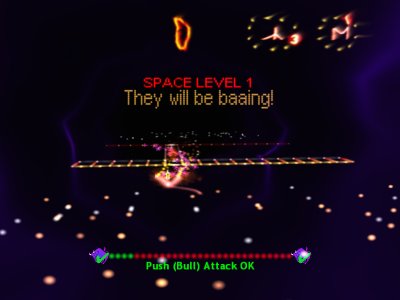
Look at the big gauge at the bottom of the screen. Notice that there’s a little bit of green but it’s mostly red.
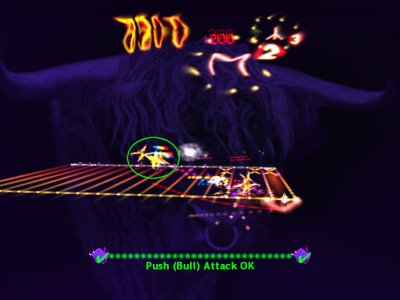
Now here’s another screenshot from a few seconds later, after the giraffe has been shooting stuff for a bit.
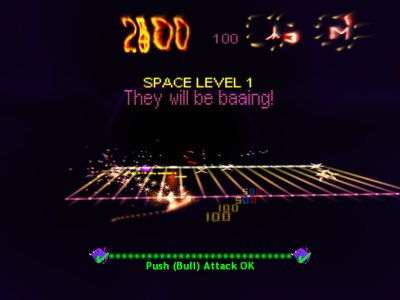
Notice that now the gauge is all green. That’s because as you shoot shit in the game, it fills up the gauge. Doing other things will fill it up too, like collecting powerups; we’ll get to that later. But basically the more you do stuff in-game, the more the gauge fills up; and the more you are idle, the more it drains away.
Now you may be thinking that that big-ass gauge there is pretty damn fugly, and actually you’d be right. It looks rubbish. And trust me, there will come times when the action becomes so hectic that you won’t be wanting to keep looking down at the bottom of the screen at that ugly-ass gauge all the time.
Well, you don’t have to. Take a look at those two screenshots again, paying attention to the bits I have annotated with green arrows:
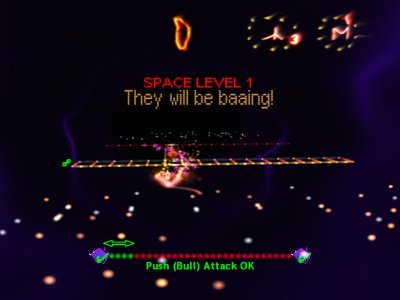
Notice how, just as the giraffe arrives on the playing surface, the lines that divide the surface up into “lanes” are quite small and close to the front edge of the surface. I’ve marked their extent with a small green line to the left of the surface. Also note the small amount of green in the large gauge at the bottom of the screen, as before. I’ve marked the extent of that with an arrow.
And now notice how, after the giraffe has shot a few things, the big gauge at the bottom of the screen has filled up with green – and the “lane marker lines” are now long and extend right to the back of the surface.
That is because the “lane marker lines” indicate the exact same thing as the green bit in the big gauge.
Effectively the whole level IS the gauge. You’ll never have to look down to the bottom of the screen to look at some ugly gauge because it’s obvious wherever you’re looking whether there are any lane marker lines or not, and if there are, how long they are. Once you are completely comfortable with that idea, you’ll want to turn off that ugly gauge forever.(Press “F1” key to toggle it ON/OFF)
Watch the video until you understand completely that the lane marker lines and the large ugly gauge display the same information.
Now that you’ve understood that, let’s move on and find out what that gauge actually represents – and how the game differs fundamentally from the likes of “Tempest”.
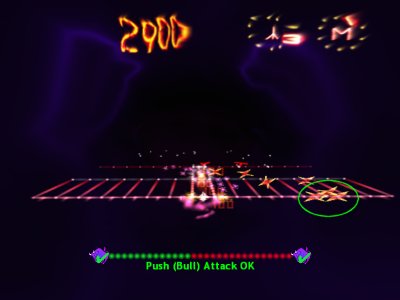
Here we are a little later into the level, and so far it’s looked a lot like Tempest – enemies arriving at the bottom of the surface, giraffe shooting down at them, all very normal. But look at the bit circled in green – some enemies have been allowed to reach the top of the surface, the near edge with your giraffe on.
In Tempest, it would now be brown trousers time. Letting enemies get to the top in Tempest is about the worst thing you can do. At best you would be looking at using up a Superzapper, and at worst you’d be looking at an ignominious death. In Tempest your main objective is to prevent the enemies reaching the top at all.
In Space Giraffe, however, your trousers remain unsoiled. In fact, as you will learn, allowing enemies to accumulate on the top edge is something you want to actively encourage.. To find out why this is, let’s look at how these intruding enemies are dealt with.
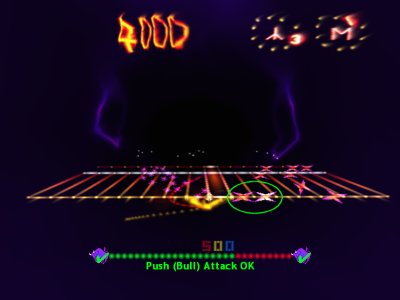
Here you can see that the enemies at the top are almost upon us. Also notice that the large ugly gauge has plenty of green in (and the lane marker lines are visible and quite long). As long as there is green in that gauge, or as long as we can see the lane marker lines – remember, they display the same information – most enemies at the top edge can’t harm us. In fact of they touch us they will be destroyed.
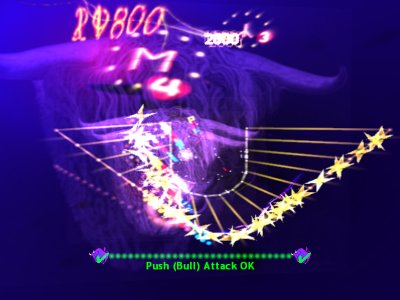
Notice that the ugly gauge is labelled “Push (Bull) Attack OK”. This alludes to the fact that since while the gauge is green we won’t be killed, and will in fact kill enemies by touching them, we can simply push enemies off the top edge by running into them.
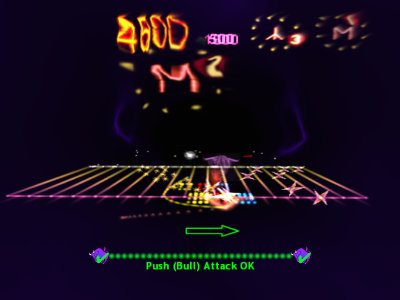
Here you can see that we just move right and push through the threatening enemies. In fact the act of pushing them away fills up the gauge even more.
More enemies are arriving at the top further to the right, so we continue the attack by moving towards them to push them off as well. The large purple bull head (and accompanying sound effect) indicates that a special bonus has been given for pushing off several enemies at once. Pushing multiple enemies off in one go to get these bonuses is called bulling, and you will want to do it whenever possible.
Here (circled in green) you can see some of the enemies that have been pushed off the web. They fly up off the surface and explode.
The rest of level 1 is pretty straightforward. Right at the end of the level you can see the push attack used again.
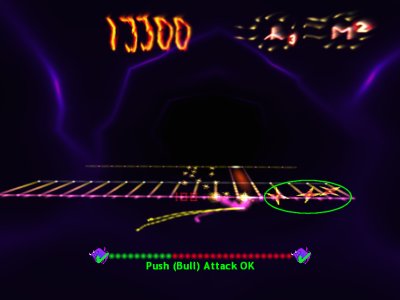
The last few enemies are arriving at the top of the surface, but there’s still some green in the gauge (we can see the lane marker lines).
We move to the right and push into the enemies, destroying them and ending the level.
Continue to watch the video until you understand completely the following things:
|
In part 2 you’ll learn how the push/bull attack is not just handy, but also strategically the best thing you can do to get big scores in Space Giraffe. This is the path to knowing how to know, unlocking the gates to your future eternity. Follow it.
Interlude

Part Two: Large Scores and the True Nature of Eternity
Now you understand about how and when you can push enemies off the top of the surface, let’s take a look at how you use that technique to obtain massive scores and extra lives.
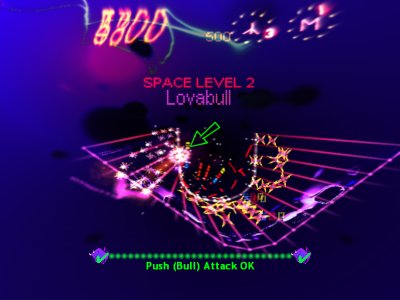
Level 2 was specifically designed for the player to prove to himself how to get high scores. In the Xbox 360 version there was an Achievement attached to this level; in the PC version there is an Award attached. It’s very easy to get; here we’ll explain exactly what you have to do, and why.

Upon arriving on the surface, we need to go and hang out shooting baddies that appear in the leftmost three or four lanes of the surface – you’ll find out why this position is important as we go along. Shoot straight down, don’t use the right analog stick to steer the bullets. I’ve left the big ugly gauge active so you can see clearly when we can and can’t use the push attack; note how its status is reflected in the length of the lane marker lines. Here we’ve shot a few bad guys and the gauge is full and the lane markers thus fully extended.
We need to loiter in that area shooting baddies until a powerup appears. Powerups always appear at the end of a lane in which you recently shot a baddie, so if you’ve been shooting straight one should appear in one of those leftmost few lanes.
The powerup is the round, fluffy-looking thing I’ve marked with an arrow. Once it appears it’ll start sliding straight up the lane it appeared in.

You want to position yourself at the top of the lane so that part of your giraffe will touch the powerup as it passes by. Don’t worry about anything else for now – you may have noticed that most of the baddies appear to be walking away from you to the right of the surface so there’s no need to worry about them yet. Just position yourself to collect that powerup.

If you do it right you’ll see this POD GET! message appear.
These “pods” are very handy things to have in Space Giraffe. You’ll be given one every time you touch a powerup, until you are carrying the maximum number of them which is 5. The pods are actually visible as small, glowing spheres that attach themselves to the rear end of your giraffe via a long, snaking cord.
Their full name is jump pod, and this gives a clue to their utility. Each one that you carry grants you one jump up and off the edge of the surface where you usually move. I am sure you can think of how that might be useful to avoid obstacles on the edge of the surface, and indeed later in the game that’s exactly how you’ll use your Pods. You might even think it’d be a good idea to use one to jump over and fire down upon that big mass of enemies that’s steadily accumulating to the right of the level, and you could indeed do that, but then you’d miss the money shot this level has been set up to give you.
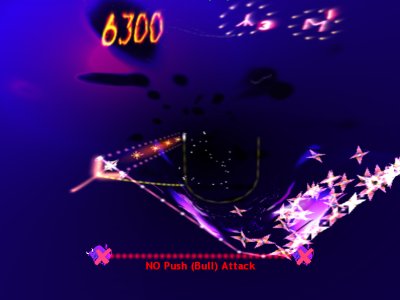
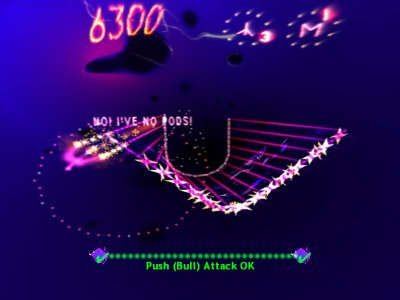
Instead, just go and sit in the leftmost lane, and wait. Your gauge will turn entirely red, and as you can see, the lane markers have disappeared. Even your shots have diminished to a single, slowing stream. In this condition you are at your most vulnerable. As the text under the gauge says, you have NO ability to do the push attack. If an enemy touches you in this state you will die. And there’s a big mob of them gathering over there on the right. So what should we do?
The answer is to wait and not panic. You’ll see the herd of baddies march across to the right edge of the surface, and then be reflected back and start marching towards you. Eventually there will be a long string of them all marching like ants along the top edge towards you.
This is what you want.
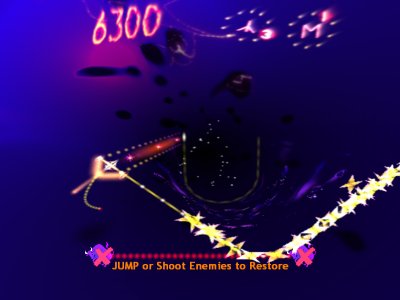
Because now you get to benefit from the other effect of using a Jump Pod: it instantly refills your Push/Bull gauge all the way.
Just jump in place over that endmost lane. You don’t want to move, or try and shoot anything whilst jumping; just jump and notice that your gauge is now full green, the lane markers are fully extended, and you are about to land back on the surface next to a long line of enemies all of which are now vulnerable to the daddy of all push attacks.
So… as soon as you land, push to the right…
you will hear a lot of mooing and see bull heads everywhere and the Bonus Multiplier increasing like crazy as you bull your way through the whole herd of defenceless baddies…
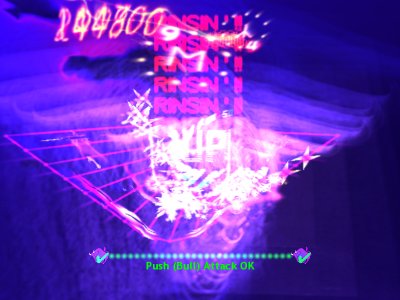
as you reach the climax of the money shot, you’ll get a Rinsin’ bonus and a 1UP, the Bonus Multiplier will go to x9, and if you haven’t already got it, you’ll get the Boi Bumba award.

Finally the mooing subsides and the threatening herd of baddies that was on the top has been entirely obliterated. There will be a few more enemies in the level to deal with before it ends, but with a full gauge, a x9 multiplier and a nice post-orgasmic glow going on you’ll have no difficulty disposing of those.
Notice that after the mooing and grunting is over, your score has risen from 6,300 to 262,300. Not bad for a single attack run. The x9 will work for you at the end of level bonus countup, too.
Once you have successfully understood and performed this manoeuvre, you will understand the true nature of Space Giraffe. It’s not just a shooter – in fact it’s more of a herd-em-up. Shooting is necessary, yes indeed – but mainly for defensive purposes, and to shape the level the way you want it to be. But the real objective of each level is to try to gather together as many baddies as you can at the top and then push as many off at one time as you can. This is what increases the bonus multiplier and gives you extra lives.
If anything you’re a farmer and the baddies are your flock. Your task on each level is to cultivate them until the optimal time… and then harvest them for great profit.
I have never told the sheep this.
Inside >>>